Showing posts with label to. Show all posts

Wednesday, December 28, 2016

Taskos To Do List for Android

Free, simple & intuitive to do list for android. Now you can add tasks by speaking to your mobile device. With Taskos to you can add, edit or delete tasks, share them with your friends, write notes, set alerts and even make calls!

New features : Share task via Email or SMS, Full Google task sync (multiple lists, multiple accounts, OATH, home screen widget, customized categories, improved sorting, swipe completed tasks, shake to remove tasks, auto-complete, quick edit of tasks information and more!

A top android to do list that actually helps you get your things done.

Key Features Taskos To Do List for Android :
- Speech to text
- Sync to Google Tasks / gTask / gTasks / google apps
- Home screen widgets (4X4, 4X1)
- Share tasks with your friends via Email or SMS
- Quick edit of tasks (Priority, Category, Due date, Share and more)
- Swipe to mark as complete
- Customized categories
- Alerts
- Notes
- Repeatable tasks
- Integration with your Facebook friends, Gmail contacts, Dropbox, Twitter followers, whatsapp or beluga friends.

* Coming versions will sync to: Todo list, Todo, Task List, Remember the milk, gTasks, RTM, Producteev, Springpad, Catch, ColorNote Notepad Notes, Google Calendar, Astrid, Outlook, Microsoft Exchange and more...

* Speech to text requires the google voice search apk

Recent changes Taskos To Do List for Android :
New & Improved sharing (via SMS and Email)
Full Google task sync (Multiple lists, Multiple accounts)
Secured authentication (OAuth)

Taskos To Do List for Android


Read More..

Wednesday, October 5, 2016

Ways to save BATTERY POWER on Android

1. Tell the device to only use 2G networks. (Settings » Wireless controls » Mobile networks » Use only 2G networks) If you do not need access to high speed data, or there is no 3G or 4G network where you live, you can tell Android to only use 2G mobile networks. You will still have access to EDGE network data and WiFi if needed.


2. Reduce the brightness of your display. (Settings » Sound & Display » Brightness) Most people can see an Android display quite well with the backlighting feature turned off. Move the slider all the way to the left, then try using the device that way. If you cant see it well in that setting, move the slider to the right only as far as necessary to view the display comfortably. Alternatively, Auto brightness coupled with power saving mode (found on most Samsung, LG, Sony, and some Motorola devices) will conservatively adjust the display to the surroundings to only the brightness necessary.


3. If your device has an AMOLED screen, always use a black background. AMOLED screens can reduce power usage sevenfold by displaying black instead of white or any other color. When searching on your phone you can also use Black Google Mobile at bGoog.com to get standard Google results (including images) all in black .

4. Set your screen timeout to the shortest length possible. (Settings » Sound & display » Screen timeout) This setting tells the device to turn off the screen after the selected period of inactivity. The shorter the period, the less power your display will use. The setting options vary from phone to phone.

5. Use the Power Control widget. (Home screen » Menu » Add » Widgets » Power control) As of Android 1.6, there is a widget that you can place on any one of your home screens that gives you quick control buttons for WiFi, Bluetooth, GPS, Push sync, and screen brightness (three levels). Use this to control your settings and turn them off to save battery power, as stated above. This is a nice easy shortcut.

6. Do not leave applications running when you dont need them. Close them and return to the home screen.

7. Switch of wi-fi, bluetooth, data networks when not in use since they consume battery while searching for signals. 

The top free power management apps available in the google play are :

BATTERY SAVER DU 

BATTERY Dr SAVER


Read More..

Wednesday, August 10, 2016

100 Ways to Make 100 Money

A Collection of 100 Legitimate Ways to Make $100 a Day!

App Features:

>> Almost 100 Tips to help you Make Money Online!
>> Easy Browsing of Tips!
>> Share Any Tip via Email!

If you’ve been on the internet for more than a few hours, you’ve likely seen at least one advertisement teaching you how to make thousands of dollars a minute, working from your underwear, in the comfort of your own home.

These ads are so ridiculously popular that if you’re like most people, you start doubting whether it really IS possible to make money online.

The truth is, it IS possible. It might be hard to make thousands of dollars a minute from the get-go (or at all), but there are certainly legitimate ways you can make an extra $100 a day working from home with ease.

In this App, We are going to share almost 100 different ways in which you can create more income. We have tried to cover all types of methods for all different personality and skill types, and We are confident that you’ll be able to find at least a few that sound good to you.

While some of them require more work than others, please know that you can mix and match. For example, maybe you can do a few hours of forum moderation at $10 an hour for $30, and then make up the extra $70 doing something else.
100 Ways to Make $100 (Money)


Read More..

Sunday, April 6, 2014

Google Maps Android API v2 example detect user touch on GoogleMap and animate to the clicked location

Modify from last eample "Set map type of GoogleMap" to detect user click on GoogleMap, and animate to the user clicked location.

Google Maps Android API v2 example: detect user touch on GoogleMap and animate to the clicked location


To detect user click event on GoogleMap, modify the FragmentActivity implements OnMapClickListener, override onMapClick(LatLng point), and call myMap.setOnMapClickListener(this).

To animated to a specified location, create a new CameraUpdate by calling CameraUpdateFactory.newLatLng(point) method with the specified location. And then call myMap.animateCamera(...) to start animation to the specified location.

package com.example.androidmapsv2;

import com.google.android.gms.common.ConnectionResult;
import com.google.android.gms.common.GooglePlayServicesUtil;
import com.google.android.gms.maps.CameraUpdateFactory;
import com.google.android.gms.maps.GoogleMap;
import com.google.android.gms.maps.SupportMapFragment;
import com.google.android.gms.maps.GoogleMap.OnMapClickListener;
import com.google.android.gms.maps.model.LatLng;

import android.app.AlertDialog;
import android.location.Location;
import android.os.Bundle;
import android.support.v4.app.FragmentActivity;
import android.support.v4.app.FragmentManager;
import android.view.Menu;
import android.view.MenuItem;
import android.widget.TextView;
import android.widget.Toast;

public class MainActivity extends FragmentActivity implements OnMapClickListener{

final int RQS_GooglePlayServices = 1;
private GoogleMap myMap;

Location myLocation;
TextView tvLocInfo;

@Override
protected void onCreate(Bundle savedInstanceState) {
super.onCreate(savedInstanceState);
setContentView(R.layout.activity_main);

tvLocInfo = (TextView)findViewById(R.id.locinfo);

FragmentManager myFragmentManager = getSupportFragmentManager();
SupportMapFragment mySupportMapFragment
= (SupportMapFragment)myFragmentManager.findFragmentById(R.id.map);
myMap = mySupportMapFragment.getMap();

myMap.setMyLocationEnabled(true);

myMap.setMapType(GoogleMap.MAP_TYPE_HYBRID);
//myMap.setMapType(GoogleMap.MAP_TYPE_NORMAL);
//myMap.setMapType(GoogleMap.MAP_TYPE_SATELLITE);
//myMap.setMapType(GoogleMap.MAP_TYPE_TERRAIN);

myMap.setOnMapClickListener(this);


}

@Override
public boolean onCreateOptionsMenu(Menu menu) {
// Inflate the menu; this adds items to the action bar if it is present.
getMenuInflater().inflate(R.menu.activity_main, menu);
return true;
}

@Override
public boolean onOptionsItemSelected(MenuItem item) {
switch (item.getItemId()) {
case R.id.menu_legalnotices:
String LicenseInfo = GooglePlayServicesUtil.getOpenSourceSoftwareLicenseInfo(
getApplicationContext());
AlertDialog.Builder LicenseDialog = new AlertDialog.Builder(MainActivity.this);
LicenseDialog.setTitle("Legal Notices");
LicenseDialog.setMessage(LicenseInfo);
LicenseDialog.show();
return true;
}
return super.onOptionsItemSelected(item);
}

@Override
protected void onResume() {
// TODO Auto-generated method stub
super.onResume();

int resultCode = GooglePlayServicesUtil.isGooglePlayServicesAvailable(getApplicationContext());

if (resultCode == ConnectionResult.SUCCESS){
Toast.makeText(getApplicationContext(),
"isGooglePlayServicesAvailable SUCCESS",
Toast.LENGTH_LONG).show();
}else{
GooglePlayServicesUtil.getErrorDialog(resultCode, this, RQS_GooglePlayServices);
}

}

@Override
public void onMapClick(LatLng point) {
tvLocInfo.setText(point.toString());
myMap.animateCamera(CameraUpdateFactory.newLatLng(point));
}

}


Modify layout file to add a TextView to display the clicked location.
<LinearLayout xmlns:android="http://schemas.android.com/apk/res/android"
xmlns:tools="http://schemas.android.com/tools"
android:layout_width="match_parent"
android:layout_height="match_parent"
android:orientation="vertical"
tools:context=".MainActivity" >

<TextView
android:id="@+id/locinfo"
android:layout_width="match_parent"
android:layout_height="wrap_content"/>
<fragment
android:id="@+id/map"
android:layout_width="match_parent"
android:layout_height="match_parent"
class="com.google.android.gms.maps.SupportMapFragment"/>

</LinearLayout>


download filesDownload the files.

Next:
- Detect long click on map and add marker


The series:
A simple example using Google Maps Android API v2, step by step.

Read More..

Saturday, April 5, 2014

Example to draw Bitmap with ShadowLayer

In the below screen capture, the background bitmap is draw normally, the upper left bitmap of Rubber Duck is draw using Paint with ShadowLayer, the middle one is the shadow layer of the Rubber Duck bitmap.

Example to draw Bitmap with ShadowLayer


package com.test.androidimageprocessing;

import java.io.FileNotFoundException;

import android.net.Uri;
import android.os.Bundle;
import android.app.Activity;
import android.content.Intent;
import android.graphics.Bitmap;
import android.graphics.Bitmap.Config;
import android.graphics.BitmapFactory;
import android.graphics.Canvas;
import android.graphics.Paint;
import android.view.View;
import android.view.View.OnClickListener;
import android.widget.Button;
import android.widget.ImageView;
import android.widget.TextView;
import android.widget.Toast;
import com.example.androidimageprocessing.R;

public class MainActivity extends Activity {

Button btnLoadImage1, btnLoadImage2;
TextView textSource1, textSource2;
Button btnProcessing;
ImageView imageResult;

final int RQS_IMAGE1 = 1;
final int RQS_IMAGE2 = 2;

Uri source1, source2;

@Override
protected void onCreate(Bundle savedInstanceState) {
super.onCreate(savedInstanceState);
setContentView(R.layout.activity_main);
btnLoadImage1 = (Button)findViewById(R.id.loadimage1);
btnLoadImage2 = (Button)findViewById(R.id.loadimage2);
textSource1 = (TextView)findViewById(R.id.sourceuri1);
textSource2 = (TextView)findViewById(R.id.sourceuri2);
btnProcessing = (Button)findViewById(R.id.processing);
imageResult = (ImageView)findViewById(R.id.result);

btnLoadImage1.setOnClickListener(new OnClickListener(){

@Override
public void onClick(View arg0) {
Intent intent = new Intent(Intent.ACTION_PICK,
android.provider.MediaStore.Images.Media.EXTERNAL_CONTENT_URI);
startActivityForResult(intent, RQS_IMAGE1);
}});

btnLoadImage2.setOnClickListener(new OnClickListener(){

@Override
public void onClick(View arg0) {
Intent intent = new Intent(Intent.ACTION_PICK,
android.provider.MediaStore.Images.Media.EXTERNAL_CONTENT_URI);
startActivityForResult(intent, RQS_IMAGE2);
}});

btnProcessing.setOnClickListener(new OnClickListener(){

@Override
public void onClick(View v) {

if(source1 != null && source2 != null){
Bitmap processedBitmap = ProcessingBitmap();
if(processedBitmap != null){
imageResult.setImageBitmap(processedBitmap);
Toast.makeText(getApplicationContext(),
"Done",
Toast.LENGTH_LONG).show();
}else{
Toast.makeText(getApplicationContext(),
"Something wrong in processing!",
Toast.LENGTH_LONG).show();
}
}else{
Toast.makeText(getApplicationContext(),
"Select both image!",
Toast.LENGTH_LONG).show();
}

}});
}

@Override
protected void onActivityResult(int requestCode, int resultCode, Intent data) {
super.onActivityResult(requestCode, resultCode, data);
if(resultCode == RESULT_OK){
switch (requestCode){
case RQS_IMAGE1:
source1 = data.getData();
textSource1.setText(source1.toString());
break;
case RQS_IMAGE2:
source2 = data.getData();
textSource2.setText(source2.toString());
break;
}
}
}

private Bitmap ProcessingBitmap(){
Bitmap bm1 = null;
Bitmap bm2 = null;
Bitmap newBitmap = null;

try {
bm1 = BitmapFactory.decodeStream(
getContentResolver().openInputStream(source1));
bm2 = BitmapFactory.decodeStream(
getContentResolver().openInputStream(source2));

int w;
if(bm1.getWidth() >= bm2.getWidth()){
w = bm1.getWidth();
}else{
w = bm2.getWidth();
}

int h;
if(bm1.getHeight() >= bm2.getHeight()){
h = bm1.getHeight();
}else{
h = bm2.getHeight();
}

Config config = bm1.getConfig();
if(config == null){
config = Bitmap.Config.ARGB_8888;
}

newBitmap = Bitmap.createBitmap(w, h, config);
Canvas newCanvas = new Canvas(newBitmap);

newCanvas.drawBitmap(bm1, 0, 0, null);

Paint paint = new Paint();
paint.setShadowLayer(50.0f, 200.0f, 100.0f, 0xFF000000);
newCanvas.drawBitmap(bm2, 0, 0, paint);

} catch (FileNotFoundException e) {
// TODO Auto-generated catch block
e.printStackTrace();
}

return newBitmap;
}

}


The layout file refer to the post "Combine bitmap side-by-side".


download filesDownload the files.


more: Something about processing images in Android

Read More..

Thursday, April 3, 2014

C code to convert INFIX expression into POSTFIX expression

//C program to convert given INFIX expression into POSTFIX expression using stack//

#include<stdio.h>
#include<conio.h> 
#include<string.h>
#define MAX 20

char stack[MAX];
int top=-1;
char pop();
void push(char item);

int prcd(char symbol)
{
switch(symbol)
{
case +:
case -:return 2;
break;
case *:
case /:return 4;
break;
case ^:
case $:return 6;
break;
case (:
case ):
case #:return 1; 
break;
}
}
 
int isoperator(char symbol)
{
switch(symbol) 
{
case +:
case -:
case *:
case /:
case ^:
case $:
case (:
case ):return 1;
break;
default:return 0;
}
}

 
void convertip(char infix[],char postfix[])
{
int i,symbol,j=0;
stack[++top]=#;
for(i=0;i<strlen(infix);i++)
{
symbol=infix[i];
if(isoperator(symbol)==0)
{
postfix[j]=symbol;
j++;
}
else{ 
if(symbol==()
push(symbol); 
else
if(symbol==))
{
while(stack[top]!=()
{ 
postfix[j]=pop();
j++; 
}
pop();//pop out 
}

else{
if(prcd(symbol)>prcd(stack[top]))
push(symbol);
else{
while(prcd(symbol)<=prcd(stack[top]))
{
postfix[j]=pop();
j++;
}
push(symbol);

}//end of else.

}//end of else.

}//end of else.

}//end of for.

while(stack[top]!=#)
{
postfix[j]=pop();
j++;
}
postfix[j]=
Read More..

Sunday, March 30, 2014

C code to implement BFS and DFS

/* C program to implement BFS(breadth-first search) and DFS(depth-first search) algorithm */

#include<stdio.h>

int q[20],top=-1,front=-1,rear=-1,a[20][20],vis[20],stack[20];
int delete();
void add(int item);
void bfs(int s,int n);
void dfs(int s,int n);
void push(int item);
int pop();

void main()
{
int n,i,s,ch,j;
char c,dummy;
printf("ENTER THE NUMBER VERTICES ");
scanf("%d",&n);
for(i=1;i<=n;i++)
{
for(j=1;j<=n;j++)
{
printf("ENTER 1 IF %d HAS A NODE WITH %d ELSE 0 ",i,j);
scanf("%d",&a[i][j]);
}
}
printf("THE ADJACENCY MATRIX IS
");
for(i=1;i<=n;i++)
{
for(j=1;j<=n;j++)
{
printf(" %d",a[i][j]);
}
printf("
");
}

do
{
for(i=1;i<=n;i++)
vis[i]=0;
printf("
MENU");
printf("
1.B.F.S");
printf("
2.D.F.S");
printf("
ENTER YOUR CHOICE");
scanf("%d",&ch);
printf("ENTER THE SOURCE VERTEX :");
scanf("%d",&s);

switch(ch)
{
case 1:bfs(s,n);
break;
case 2:
dfs(s,n);
break;
}
printf("DO U WANT TO CONTINUE(Y/N) ? ");
scanf("%c",&dummy);
scanf("%c",&c);
}while((c==y)||(c==Y));
}


//**************BFS(breadth-first search) code**************//
void bfs(int s,int n)
{
int p,i;
add(s);
vis[s]=1;
p=delete();
if(p!=0)
printf(" %d",p);
while(p!=0)
{
for(i=1;i<=n;i++)
if((a[p][i]!=0)&&(vis[i]==0))
{
add(i);
vis[i]=1;
}
p=delete();
if(p!=0)
printf(" %d ",p);
}
for(i=1;i<=n;i++)
if(vis[i]==0)
bfs(i,n);
}


void add(int item)
{
if(rear==19)
printf("QUEUE FULL");
else
{
if(rear==-1)
{
q[++rear]=item;
front++;
}
else
q[++rear]=item;
}
}
int delete()
{
int k;
if((front>rear)||(front==-1))
return(0);
else
{
k=q[front++];
return(k);
}
}


//***************DFS(depth-first search) code******************//
void dfs(int s,int n)
{
int i,k;
push(s);
vis[s]=1;
k=pop();
if(k!=0)
printf(" %d ",k);
while(k!=0)
{
for(i=1;i<=n;i++)
if((a[k][i]!=0)&&(vis[i]==0))
{
push(i);
vis[i]=1;
}
k=pop();
if(k!=0)
printf(" %d ",k);
}
for(i=1;i<=n;i++)
if(vis[i]==0)
dfs(i,n);
}
void push(int item)
{
if(top==19)
printf("Stack overflow ");
else
stack[++top]=item;
}
int pop()
{
int k;
if(top==-1)
return(0);
else
{
k=stack[top--];
return(k);
}
}

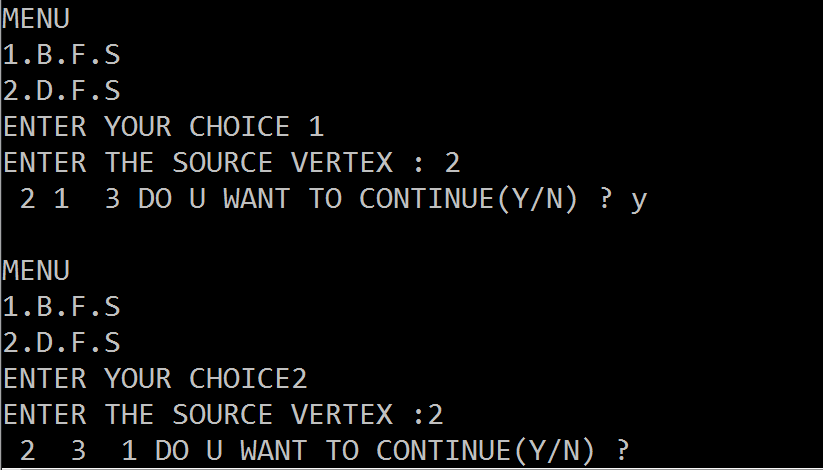
/* Output of BFS(breadth-first search) and DFS(depth-first search) program */

C code to implement BFS and DFS
Output of BFS and DFS Program

C code to implement BFS and DFS
Output of BFS and DFS Program

For more related to Data Structure see List of Data Structure Programs. If you like this program, Please share and comment to improve this blog. Thanks.. :)
Read More..

Monday, March 3, 2014

Google invites Glass Explorer Edition owners to upgrade their eyewear


Google promised early Glass wearers that they could eventually upgrade to next-generation Explorer hardware, and that moment is finally at hand. The company is now inviting owners to swap devices through a free mail exchange before February 5th. While the upgrade isnt mandatory, Google warns that its only developing with the newer Explorer Edition in mind -- theres no guarantee that new accessories or software will work on old models. The invitation is more of a push than a gentle nudge, then, but we doubt that many Glass users will complain about a free update. Check out an excerpt from the invitation after the break.

Read More..